
SPA(Single Page Application)
SPA(Single Page Application)는 서버로부터 완전한 새로운 페이지를 불러오지 않고 현재의 페이지를 동적으로 다시 작성함으로써 사용자와 소통하는 웹 애플리케이션을 말한다.
 SPA
SPA
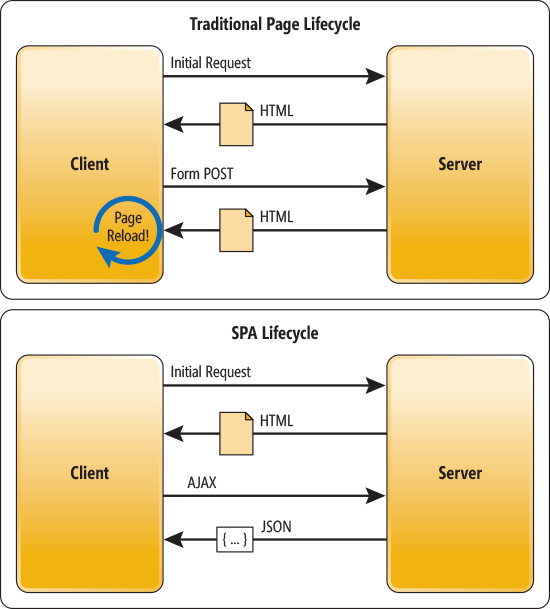
이전의 전통적인 방식에서는 처음 웹홈페이지에 접속하면 서버에서는 그에 맞는 HTML 정보를 전달해준다. 그러고 다른 페이지에 들어간다거나 하면 서버에 요청해 또 그에 맞는 HTML 정보를 받는다. 그렇다보니 동일한 데이터도 계속 받게되는 일이 발생하게 된다.
예를 들어 웹사이트에서 보통 다른 페이지로 이동할 때 상단 바 또는 사이드 메뉴는 바뀌지 않는 경우가 많은데 이러한 부분들도 매번 똑같은 데이터를 받고 Reload를 하는 것이다.
그러나 SPA 방식에서는 처음 접속할때만 서버로부터 필요한 HTML 정보들을 받고 이후에는 AJAX를 통해 데이터만 요청하고 받아 클라이언트에서 렌더링하여 사용자에게 보여준다. 쉽게 말해 변하는 내용 부분만 따로 받고 렌더링해서 보여준다는 것이다.
- AJAX(Asynchronous Javascript And XML) - Javascript 비동기 통신, XML 데이터를 주고 받는 기술
Blazor 구조
앞 포스트에서 Blazor Server 구조에 대해 코드를 따라가보는 방식으로 간단하게 살펴보았는데 이번엔 위 SPA 개념을 이해한채로 좀 더 자세히 뜯어보는 방식으로 살펴보겠다.
위 SPA 개념에 따르면 어떤 틀이 있고 그 틀안에 내용만 계속 바뀐다는 것인데 Blazor Server 프로젝트를 생성해 그냥 실행시켜보면 중앙 컨텐츠 부분은 페이지 이동에 따라 계속 바뀌지만 위 옆 사이드 부분은 바뀌지 않는 것을 볼 수 있을 것이다.
그렇다면 그 틀은 어디서 정의해주고 있는 것일까.
결론부터 말하자면 Shared 폴더 안 MainLayout.razor 파일에서 정의해주고 있다.
Layout
MainLayout.razor
1
2
3
4
5
6
7
8
9
10
11
12
13
14
15
@inherits LayoutComponentBase

<div class="sidebar">
    <NavMenu />
</div>

<div class="main">
    <div class="top-row px-4">
        <a href="https://docs.microsoft.com/aspnet/" target="_blank">About</a>
    </div>

    <div class="content px-4">
        @Body
    </div>
</div>
MainLayout.razor에 가보면 첫줄부터 이미 다른 Razor Component들과 다르게 LayoutComponentBase를 상속받고 있는 것을 볼 수 있다.
상속받고 있는 LayoutComponentBase 이름만 봐도 Layout 관련 Component임을 짐작해볼 수 있을 것이다. LayoutComponentBase를 세부적으로 열어보면 아래와 같이 되어 있다.
LayoutComponentBase
1
2
3
4
5
6
7
8
9
10
namespace Microsoft.AspNetCore.Components
{
    public abstract class LayoutComponentBase : ComponentBase
    {
        protected LayoutComponentBase();

        [Parameter]
        public RenderFragment Body { get; set; }
    }
}
LayoutComponentBase 내부를 살펴보면 Parameter를 통해 RenderFragment형태로 Body를 받고 있는 것을 볼 수 있다. 그리고 다시 MainLayout.razor로 돌아가보면 @Body로 사용하고 있는 것을 볼 수 있다.
여기까지를 통해 알 수 있는 것은 공통적인 Layout부분은 MainLayout.razor로 만들어 놓았고 그 안에 담길 컨텐츠부분은 Parameter로 받아 표현되고 있다는 것이다.
참고로 당연히 다른 Layout을 만들어 볼수도 있다.
Shared 폴더에 Razor Component를 새로 생성해보고 이름은 Layout2라고 지어보자. 그리고 내용은 일단 MainLayout.razor를 그대로 복사해오고 원래 Layout과 구분해주기 위해 About 문자 부분만 Layout2라고 수정해놓자.
Layout2.razor
1
2
3
4
5
6
7
8
9
10
11
12
13
14
15
@inherits LayoutComponentBase

<div class="sidebar">
    <NavMenu />
</div>

<div class="main">
    <div class="top-row px-4">
        <a href="https://docs.microsoft.com/aspnet/" target="_blank">Layout2</a>
    </div>

    <div class="content px-4">
        @Body
    </div>
</div>
그 다음 Counter 페이지만 Layout2를 적용시켜보자. Counter.razor에 가서 아래와 같이 @layout Layout2 만 넣어주면 된다.
Counter.razor
1
2
3
4
5
6
7
8
9
10
11
12
13
14
15
16
17
@page "/counter"
@layout Layout2

<h1>Counter</h1>

<p>Current count: @currentCount</p>

<button class="btn btn-primary" @onclick="IncrementCount">Click me</button>

@code {
    private int currentCount = 0;

    private void IncrementCount()
    {
        currentCount++;
    }
}
실행시켜보면 Counter 페이지만 Layout2로 적용된 것을 볼 수 있다. 그렇다면 나머지 다른 페이지들은 기본적으로 MainLayout을 적용받고 있다는 것인데 그에 대한 설정은 어디서 해주고 있는 것일까.
바로 App.razor에서 해주고 있다. App.razor에 가보면 DefaultLayout을 MainLayout으로 설정해주고 있는 것을 볼 수 있다.
App.razor
1
2
3
4
5
6
7
8
9
10
<Router AppAssembly="@typeof(Program).Assembly">
    <Found Context="routeData">
        <RouteView RouteData="@routeData" DefaultLayout="@typeof(MainLayout)" />
    </Found>
    <NotFound>
        <LayoutView Layout="@typeof(MainLayout)">
            <p>Sorry, there's nothing at this address.</p>
        </LayoutView>
    </NotFound>
</Router>
추가적으로 현재 프로젝트에 _Imports.razor 파일이 있을 것인데 Pages 폴더 안에 똑같은 이름으로 _Imports.razor를 생성하고 안에 @layout Layout2 을 넣은 뒤 실행시켜보면 모든 페이지가 Layout2로 적용된 것을 볼 수 있다.
_Imports.razor는 같은 폴더안에 있는 모든 Razor Component에게 다 적용되는 파일이라고 할 수 있다.
이런식으로 DefaultLayout을 지정하지 않고도 Layout을 적용시킬 수 있다.
여까지 Layout 부분에 대해 살펴보았다면 그 다음으로는 Rounter 부분에 대해 살펴보자.
Rounter
먼저 App.razor에 가보면 Router라는 것이 나오는데
App.razor
1
2
3
4
5
6
7
8
9
10
<Router AppAssembly="@typeof(Program).Assembly">
    <Found Context="routeData">
        <RouteView RouteData="@routeData" DefaultLayout="@typeof(MainLayout)" />
    </Found>
    <NotFound>
        <LayoutView Layout="@typeof(MainLayout)">
            <p>Sorry, there's nothing at this address.</p>
        </LayoutView>
    </NotFound>
</Router>
Router
1
2
3
4
5
6
7
8
9
10
11
12
13
14
15
16
17
18
19
20
namespace Microsoft.AspNetCore.Components.Routing
{
    public class Router : IComponent, IHandleAfterRender, IDisposable
    {
        public Router();

        [Parameter]
        public IEnumerable<Assembly> AdditionalAssemblies { get; set; }
        [Parameter]
        public Assembly AppAssembly { get; set; }
        [Parameter]
        public RenderFragment<RouteData> Found { get; set; }
        [Parameter]
        public RenderFragment NotFound { get; set; }

        public void Attach(RenderHandle renderHandle);
        public void Dispose();
        public Task SetParametersAsync(ParameterView parameters);
    }
}
이 Router를 세부적으로 열어보면 얘 또한 Component인 것을 알 수 있다. 또한 Found랑 NotFount에 대해 태그 형식으로 작성해 주었는데 이 또한 RenderFragment형식으로 받아 주고 있는 것을 알 수 있다.
Router는 우리가 웹페이지 주소(URL)를 입력하면 해당 경로에 맞게 페이지를 찾아주는 역할을 한다. 그리고 페이지를 찾기 위해서는 각 페이지 마다 아래와 같이 경로를 지정해주어야 한다.
1
@page "/counter"
추가적으로 경로를 입력할 때 ‘/counter/55’ 이런식으로 인자를 넘겨줄 수도 있는데 이는 아래와 같이 받아 사용할 수 있다.
Counter.razor
1
2
3
4
5
6
7
8
9
10
11
12
13
14
15
16
17
18
19
20
@page "/counter"
<!-- Route parameter -->
@page "/counter/{CurrentCount:int}"

<h1>Counter</h1>

<p>Current count: @CurrentCount</p>

<button class="btn btn-primary" @onclick="IncrementCount">Click me</button>

@code {
    [Parameter]
    public int CurrentCount { get; set; }

    private void IncrementCount()
    {
        CurrentCount++;
    }
}
실행시켜 ‘/counter/57’ 이런식으로 주소를 입력해보면 Count가 57이 되어 있는 것을 볼 수 있을 것이다.
여까지 Blazor 구조와 Layout 적용 방법, Routing까지 살펴보았다.