
Dependency Injection
Dependency Injection 줄여서 DI라고 하기도 하고, 우리말로는 의존성 주입이라고 하기도 한다.
Dependency Injection을 제대로 이해하려면 먼저 Dependency(의존성)에 대해 이해해야한다.
Dependency (의존성)
그냥 “A가 B에게 의존한다.”라고 하면 크게 와닿지 않을 것이다. 의존한다라는 의미가 추상적이기 때문이다. 그러나 의존한다는 아래와 같이 정의해볼 수 있다.
“B가 변하면 A에게 영향을 미친다.”
즉 B가 변할 때 A에게 영향을 미치면 A는 B에게 의존한다라고 할 수 있다.
의존관계를 코드로 표현해보면 아래와 같다.
FoodService.cs
1
2
3
4
5
6
7
8
9
10
11
12
13
14
15
16
17
18
19
20
public class Food
{
    public string Name { get; set; }
    public int Price { get; set; }
}

public class FoodService
{
    public List<Food> GetFoods()
    {
        List<Food> foods = new List<Food>()
        {
            new Food(){Name = "Bibimbap", Price = 7000 },
            new Food(){Name = "Kimbap", Price = 3000 },
            new Food(){Name = "Bossam", Price = 9000 }
        };

        return foods;
    }
}
Index.razor
1
2
3
4
5
6
7
8
9
10
11
12
13
14
15
16
17
@page "/"

@using BlazorApp.Data;

<div>
    <!-- Food 목록 출력 -->
    @foreach(var food in _foodService.GetFoods())
    {
        <div>@food.Name</div>
        <div>@food.Price</div>
    }
</div>

@code{
    // FoodService 객체 생성
    FoodService _foodService = new FoodService();
}
우리가 식당 개점을 해본다고 생각하면서 보면 좀 더 이해하기 쉬울 것이다.
Index.razor에서는 FoodService 객체를 생성해 Food 목록을 받아 출력해주고 있다.
여기서 만약 FoodService 클래스 내부가 바뀌거나 다른 FoodService가 생긴다거나 하면 Index.razor 또한 그에 맞게 수정해주어야 할 것이다.
FoodService가 변하게 되면 Index.razor에게 영향을 미친다는 의미이다. 그렇기에 Index.razor는 FoodService에게 의존한다고 할 수 있다.
이런식으로 직접적으로 연결되서 사용하는 경우에는 의존성이 강하다고 할 수 있다.
의존성이 강하면 그닥 좋지는 않다.
앞에서도 말했다싶이 FoodService가 수정되면 그에 맞게 Index.razor도 수정해주어야 한다. 지금은 코드가 간단해서 큰 문제는 아니겠지만 코드가 복잡할수록 유지보수가 힘들어 질 것이다.
이 문제를 개선하려면 어떻게 해야할까. 일단 interface를 사용해볼 수 있다.
FoodService에 대한 interface를 만들고 각 클라이언트에서는 interface를 통해 FoodService를 사용하는 것이다.
코드로 표현하면 아래와 같다.
FoodService.cs
1
2
3
4
5
6
7
8
9
10
11
12
13
14
15
16
17
18
19
20
21
22
23
24
25
26
public class Food
{
    public string Name { get; set; }
    public int Price { get; set; }
}

// interface 만들기
public interface IFoodService
{
    IEnumerable<Food> GetFoods();
}

public class FoodService : IFoodService
{
    public IEnumerable<Food> GetFoods()
    {
        List<Food> foods = new List<Food>()
        {
            new Food(){Name = "Bibimbap", Price = 7000 },
            new Food(){Name = "Kimbap", Price = 3000 },
            new Food(){Name = "Bossam", Price = 9000 }
        };

        return foods;
    }
}
Index.razor
1
2
3
4
5
6
7
8
9
10
11
12
13
14
15
16
@page "/"

@using BlazorApp.Data;

<div>
    @foreach(var food in _foodService.GetFoods())
    {
        <div>@food.Name</div>
        <div>@food.Price</div>
    }
</div>

@code{
    // interface로 객체 받기
    IFoodService _foodService = new FoodService();
}
이렇게 했을 경우 FoodService를 사용하는 쪽에서는 interface를 통해 기능을 사용하면되고 FoodService 쪽에서는 interface에 맞게 기능을 구현하면 된다. 또한 새로운 FoodService를 만든다고 하더라도 interface에 맞게 구현하면 사용하는 쪽에서 큰 수정 없이 사용할 수 있기 때문에 의존성이 좀 약해졌다고 할 수 있다.
예를 들어 FastFoodService라고 또다른 FoodService를 만든다고 해보자.
interface에만 맞게 구현하면 Index.razor에서는 FoodService 이름만 바꾸어 사용할 수 있다.
FoodService.cs
1
2
3
4
5
6
7
8
9
10
11
12
13
14
15
16
17
18
19
20
21
22
23
24
25
26
27
28
29
30
31
32
33
34
35
36
37
38
39
40
public class Food
    {
        public string Name { get; set; }
        public int Price { get; set; }
    }

    public interface IFoodService
    {
        IEnumerable<Food> GetFoods();
    }

    public class FoodService : IFoodService
    {
        public IEnumerable<Food> GetFoods()
        {
            List<Food> foods = new List<Food>()
            {
                new Food(){Name = "Bibimbap", Price = 7000 },
                new Food(){Name = "Kimbap", Price = 3000 },
                new Food(){Name = "Bossam", Price = 9000 }
            };

            return foods;
        }
    }

    // 새로운 FoodService
    public class FastFoodService : IFoodService
    {
        public IEnumerable<Food> GetFoods()
        {
            List<Food> foods = new List<Food>()
            {
                new Food(){Name = "Hamburger", Price = 500 },
                new Food(){Name = "Fries", Price = 2000 }
            };

            return foods;
        }
    }
Index.razor
1
2
3
4
5
6
7
8
9
10
11
12
13
14
15
16
@page "/"

@using BlazorApp.Data;

<div>
    @foreach(var food in _foodService.GetFoods())
    {
        <div>@food.Name</div>
        <div>@food.Price</div>
    }
</div>

@code{
    // FoodService 이름만 수정
    IFoodService _foodService = new FastFoodService();
}
Interface를 사용함으로써 Service를 사용하는 쪽에서는 Interface에 정의되어 있는 기능대로만 사용하면 되니 수정되더라도 큰 위화감 없이 사용할 수 있다.
하지만 아직 객체를 직접 생성해서 사용한다고 있기에 의존성 문제를 완전 해결해주지는 못하고 있다. 왜냐하면 어떤 Service를 사용할 것인가는 결국 사용하는 쪽에서 결정해주고 있고 Service가 바뀌거나 하면 어짜피 사용하는 쪽에서도 수정을 해줘야하기 때문이다. 또한 다른곳에서도 사용한다면 거기서도 새로운 객체를 생성해서 사용해야할텐데 동일한 Service지만 여러개의 객체가 생성되는 꼴이다.
이때 사용해볼 수 있는 것이 Dependency Injection이다.
Dependency Injection
Dependency Injection을 우리말로 번역하면 의존성 주입이라고 할 수 이다.
지금까지는 Service를 사용하는 쪽에서 내부적으로 어떤 Service를 사용할지 결정해주었다면 Dependency Injection은 외부에서 결정하여 주입해주는 방식이다.
ASP.NET Core에서는 Dependency Injection을 아래와 같이 사용해볼 수 있다.
Startup.cs에 가서 ConfigureServices 함수안에 Service를 추가해주기만 하면 된다.
Startup.cs
1
2
3
4
5
6
7
8
9
10
11
12
13
14
15
16
public class Startup
{
    // ...

    public void ConfigureServices(IServiceCollection services)
    {
        services.AddRazorPages();
        services.AddServerSideBlazor();
        services.AddSingleton<WeatherForecastService>();

        // Service 등록 (Dependency Injection)
        services.AddSingleton<IFoodService, FastFoodService>();
    }

    // ...
}
그리고 사용하는 쪽에서는 아래와 같이 선언해주고 사용하면된다.
Index.razor
1
2
3
4
5
6
7
8
9
10
11
12
13
14
15
16
17
@page "/"

@using BlazorApp.Data;
<!-- FoodService를 주입받기 (Dependency Injection) -->
@inject IFoodService foodService;

<div>
    @foreach(var food in foodService.GetFoods())
    {
        <div>@food.Name</div>
        <div>@food.Price</div>
    }
</div>

@code{

}
이전까진 사용하는 쪽에서 어떤 FoodService를 사용할지 결정하고 객체를 따로 생성해서 사용하였다면 지금은 Startup.cs에서 어떤 FoodService를 할지 일괄적으로 결정해주고 해당 Service를 사용하는 쪽에 주입해주고 있다. 그렇기에 만약 다른 FoodService를 적용시키고 싶다면 그냥 Startup.cs 내에 ConfigureServices만 수정해주면 된다.
또한 하나 더 추가적인 특징으로는 Dependency Injection을 사용할 때 다른 Service들끼리도 자동으로 연결시켜 줄 수 있다는 것이다.
예를 들어 위 예제에서 결제서비스로 PaymentService를 만든다고 하였을 때 어떤 FoodService를 사용하고 있는지 알기 위해 아래와 같이 생성자에서 FoodService를 인자로 받아볼 수 있을 것이다.
1
2
3
4
5
6
7
8
9
10
11
public class PaymentService
{
    IFoodService _service;

    public PaymentService(IFoodService service)
    {
        _service = service;
    }

    // 기능 구현
}
이러할때 Startup.cs에 똑같이 등록해 놓으면 자동으로 연결시켜 준다.
우리가 따로 인자를 넘겨주지 않아도 알아서 생성자를 호출할 때 현재 생성해놓은 FoodService를 인자로 넘겨준다는 것이다.
Startup.cs
1
2
3
4
5
6
7
8
9
10
11
12
13
14
15
16
17
public class Startup
{
    // ...

    public void ConfigureServices(IServiceCollection services)
    {
        services.AddRazorPages();
        services.AddServerSideBlazor();
        services.AddSingleton<WeatherForecastService>();

        services.AddSingleton<IFoodService, FastFoodService>();
        // 생성될때 자동으로 알아서 FoodService를 인자로 넘겨줌
        services.AddSingleton<PaymentService>();
    }

    // ...
}
SingletonService, TransientService, ScopedService
마지막으로 Dependency Injection을 사용할 때 3가지 모드가 있다.
- SingletonService
- TransientService
- ScopedService
3가지 모드 모두 Dependency Injection이지만 수명주기에 차이가 있다.
테스트를 위해 아래와 같이 3가지의 Service를 만들어 보겠다.
1
2
3
4
5
6
7
8
9
10
11
12
13
14
15
16
17
18
19
20
21
22
23
24
25
26
27
28
29
30
31
32
33
34
35
36
37
38
39
40
41
42
43
44
45
46
// Guid는 유니크한 ID를 생성하고 관리할 때 유용한 클래스이다.

public class SingletonService : IDisposable
{
    public Guid ID { get; set; }

    public SingletonService()
    {
        ID = Guid.NewGuid();
    }

    public void Dispose()
    {
        Console.WriteLine("SingletonService Disposed");
    }
}

public class TransientService : IDisposable
{
    public Guid ID { get; set; }

    public TransientService()
    {
        ID = Guid.NewGuid();
    }

    public void Dispose()
    {
        Console.WriteLine("TransientService Disposed");
    }
}

public class ScopedService : IDisposable
{
    public Guid ID { get; set; }

    public ScopedService()
    {
        ID = Guid.NewGuid();
    }

    public void Dispose()
    {
        Console.WriteLine("ScopedService Disposed");
    }
}
그리고 Startup.cs에 각자 다른 모드로 Dependency Injection을 해주고 ID를 페이지에 출력하도록 해보자.
Startup.cs
1
2
3
4
5
6
7
8
9
10
11
12
13
14
15
16
17
18
public class Startup
{
    // ...

    public void ConfigureServices(IServiceCollection services)
    {
        services.AddRazorPages();
        services.AddServerSideBlazor();
        services.AddSingleton<WeatherForecastService>();

        // 3가지 모드
        services.AddSingleton<SingletonService>();
        services.AddTransient<TransientService>();
        services.AddScoped<ScopedService>();
    }

    // ...
}
Index.razor
1
2
3
4
5
6
7
8
9
10
11
12
13
14
15
16
17
18
19
20
@page "/"

@using BlazorApp.Data;

@inject SingletonService singleton;
@inject TransientService transient;
@inject ScopedService scoped;

<div>
    <h1>Singleton</h1>
    Guid: @singleton.ID
    <h1>Transient</h1>
    Guid: @transient.ID
    <h1>Scoped</h1>
    Guid: @scoped.ID
</div>

@code{

}
실행시켜 페이지도 왔다갔다해보고 새로고침도 해보면 수명주기를 확인해볼 수 있다.
페이지를 왔다갔다 해보면 Transient의 ID만 바뀌고,
페이지를 새로고침 해보면 Transient와 Scoped의 ID가 바뀌는 것을 볼 수 있다.
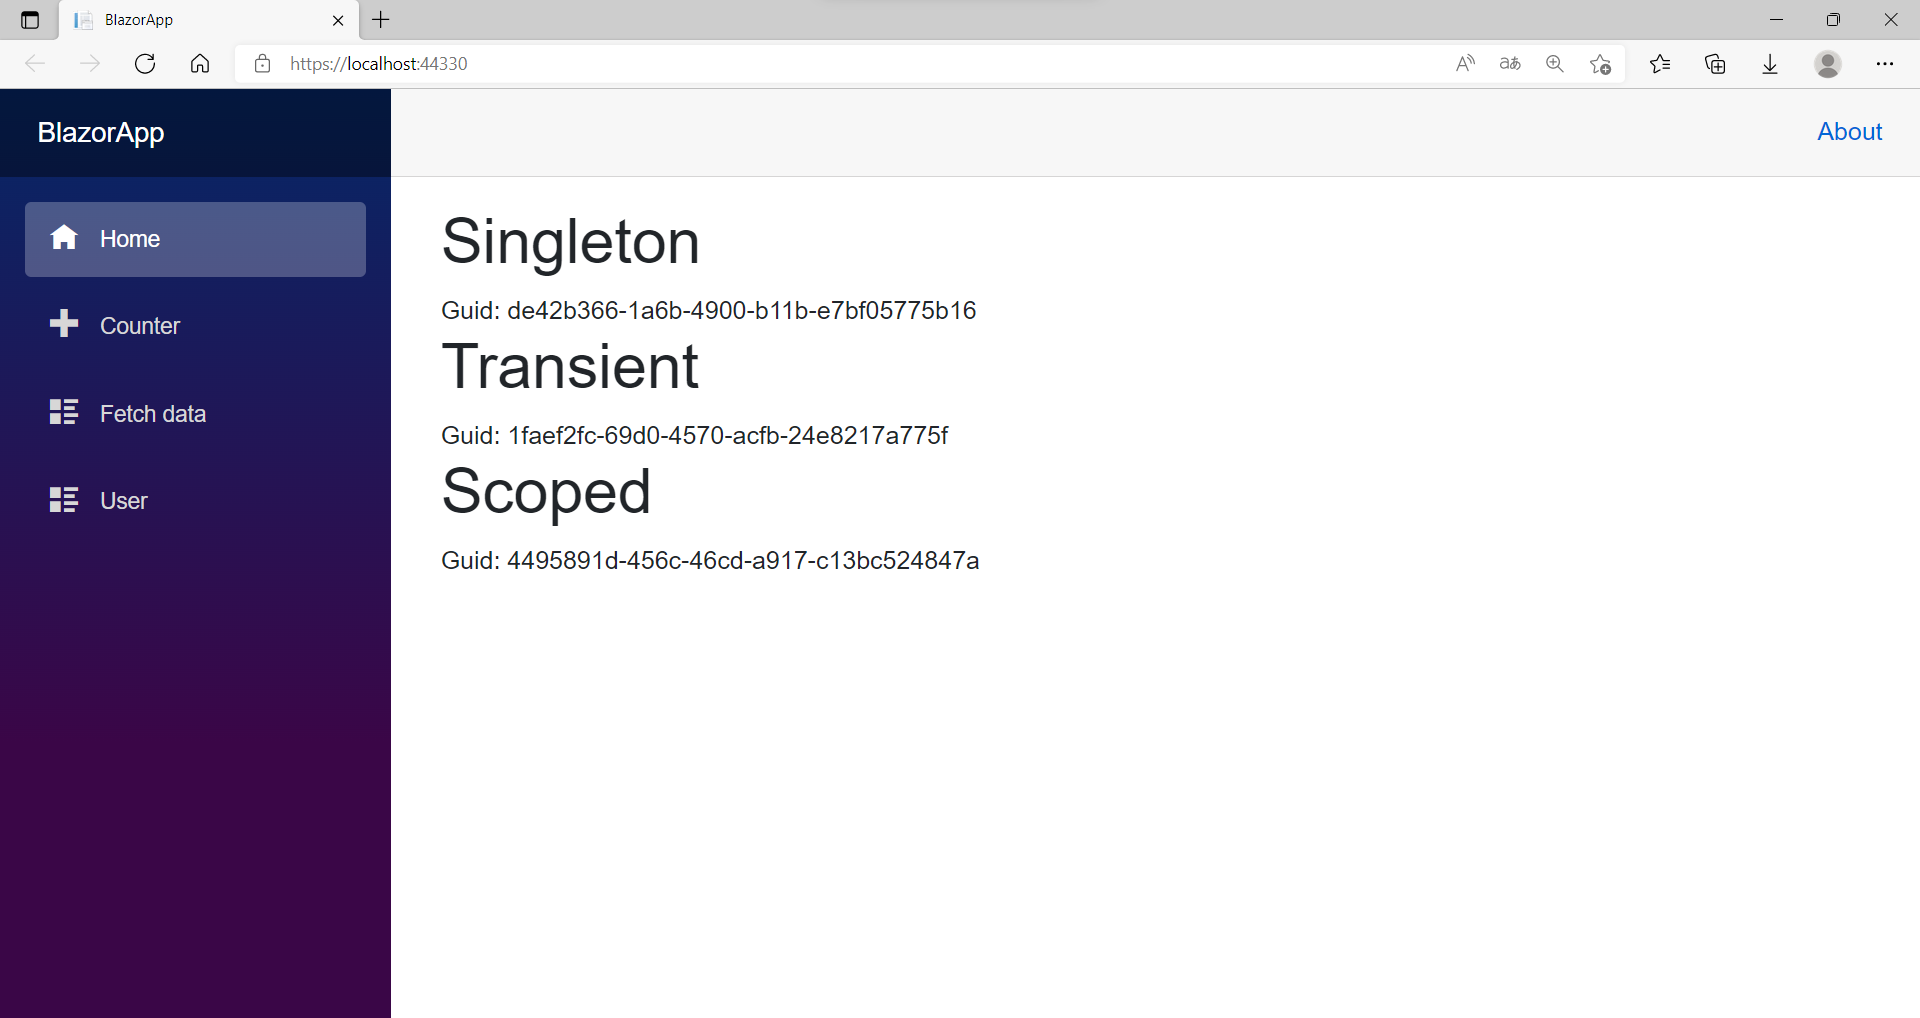 Singleton, Transient, Scoped 수명주기 테스트 화면
위 결과를 정리하자면 Singleton의 경우 서버를 처음 실행시킬때 생성된 이후로 변함이 없고, Transient는 매번 요청할 때마다 변하고, Scoped는 처음 접속하여 요청할 때만 변한다.
따라서 3가지 모드의 수명주기를 비교하자면 아래와 같다.
수명주기: Singleton > Scoped > Transient
위 차이를 알고 상황에 맞게 골라 Dependency Injection을 사용하면 된다.